반응형

Netmiko  

- Netmiko 라이브러리는 SSH/TELNET 프로토콜을 사용하여 네트워크 장비를 CLI기반으로 접근하여 정보를 수집하거나 명령어를 전달 할 수 있게하는 라이브러리 입니다. 


사용을 하기전에 Python, Netmiko 라이브러리를 설치를 하셔야 합니다.


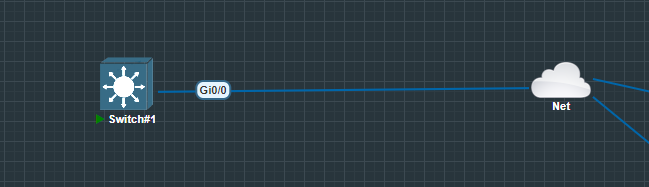
Switch#1에서 ssh 통신이 되도록 기본 설정을 해줍니다 (생략)


from netmiko import ConnectHandler # 모듈 import

# 네트워크 장비의 접속 프로파일 작성
# Dict 형태로 작성
cisco1 = {
    'device_type' : 'cisco_ios',
    'ip' : '192.168.10.1',
    'username' : 'admin',
    'password' : 'admin',
    'secret' : 'admin', # enable 모드로 진입하기 위함
    'port': '22',
    'verbose' : True,
    "session_log" : "output.txt" # 파일을 만들지 않아도 로그저장
}

net_connect = ConnectHandler(**cisco1) # cisco1 장비 ssh 접속, Dict 형태로 작성되었기 때문에 **를 붙여 준다.

net_connect.enable() # enable 모드 활성화

print(net_connect.find_prompt()) #호스트네임 확인

output2 = net_connect.send_config_set('ip route 10.10.10.0 255.255.255.0 192.168.0.1','\n')# Config ter에서 여러개의 커맨드
print(output2)

conf_set = ["ip dhcp pool user","network 192.168.10.0 255.255.255.0","default-router 192.168.10.254", "dns-server 8.8.8.8",'\n']
output2 = net_connect.send_config_set(conf_set) # Config ter에서 여러개의 커맨드
print(output2)

output = net_connect.send_command('show int status') # 한개의 커맨드
print(output)


output = net_connect.disconnect() # ssh 종료
print(output)

-----------------------------------------------------------------------------------------------------------------

실행을 하면 아래 처럼 결과가 뜹니다.

그리고 위에 파이썬 파일 저장한 곳에 "output.txt" 생성되면 로그가 저장이 됩니다


SSH connection established to 192.168.10.1:22
Interactive SSH session established
L3-1#
config term
Enter configuration commands, one per line.  End with CNTL/Z.
L3-1(config)#ip route 10.10.10.0 255.255.255.0 192.168.0.1
L3-1(config)#end
L3-1#
config term
Enter configuration commands, one per line.  End with CNTL/Z.
L3-1(config)#ip dhcp pool user
L3-1(dhcp-config)#network 192.168.10.0 255.255.255.0
L3-1(dhcp-config)#default-router 192.168.10.254
L3-1(dhcp-config)#dns-server 8.8.8.8
L3-1(dhcp-config)#
L3-1(dhcp-config)#end
L3-1#
Port      Name               Status       Vlan       Duplex  Speed Type 
Gi0/0                        connected    routed     a-full   auto RJ45
Gi0/1                        notconnect   routed     a-full   auto RJ45
Gi0/2                        notconnect   1          a-full   auto RJ45
Gi0/3                        notconnect   1          a-full   auto RJ45
Gi1/0                        notconnect   1          a-full   auto RJ45
Gi1/1                        notconnect   1          a-full   auto RJ45
Gi1/2                        notconnect   1          a-full   auto RJ45
Gi1/3                        notconnect   1          a-full   auto RJ45
None
[Finished in 11.0s]

반응형
반응형

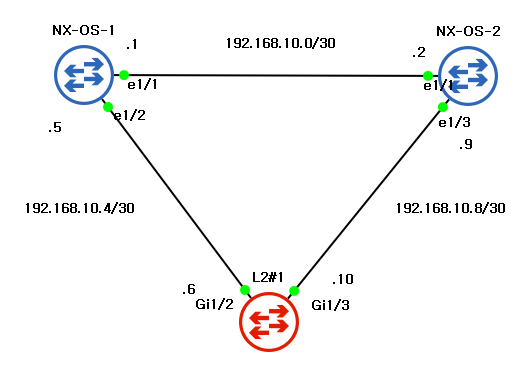
OSPF area 0으로 설정


- OSPF 설정

[NX-OS#1]

N9K1(config)# feature ospf

N9K1(config)# router ospf 1

N9K1(config-router)# router-id 1.1.1.1


N9K1(config-router)# interface e1/1
N9K1(config-if)# no sw
N9K1(config-if)# ip add 192.168.10.1/30

N9K1(config-if)# ip router ospf 1 area 0

N9K1(config-if)# no sh


N9K1(config-if)# inter e1/2
N9K1(config-if)# no sw
N9K1(config-if)# ip add 192.168.10.5/30

N9K1(config-if)# ip router ospf 1 area 0

N9K1(config-if)# no sh


[NX-OS#2]

N9K2(config)# feature ospf

N9K2(config)# router ospf 1
N9K2(config-router)# router-id 2.2.2.2


N9K2(config-router)# interface  e1/1
N9K2(config-if)# no sw
N9K2(config-if)# ip add 192.168.10.2/30
N9K2(config-if)# ip router ospf 1 area 0
N9K2(config-if)# no sh


N9K2(config-if)# interface e1/3
N9K2(config-if)# no sw
N9K2(config-if)# ip add 192.168.10.9/30
N9K2(config-if)# ip router ospf 1 area 0
N9K2(config-if)# no sh


[IOS#3]

Switch(config)#interface g1/2
Switch(config-if)#no sw

Switch(config-if)#ip add 192.168.10.6 255.255.255.252
Switch(config-if)#no sh


Switch(config-if)#inter g1/3
Switch(config-if)#no sw

Switch(config-if)#ip add 192.168.10.10 255.255.255.252
Switch(config-if)#no sh


Switch(config)#router ospf 1

Switch(config-router)#router-id 3.3.3.3
Switch(config-router)#net 192.168.10.4 0.0.0.3 area 0
Switch(config-router)#net 192.168.10.8 0.0.0.3 area 0


- OSPF 확인

[NX-OS#1]

N9K1(config-if)# sh ip ospf neighbors
 OSPF Process ID 1 VRF default
 Total number of neighbors: 2
 Neighbor ID     Pri     State           Up Time     Address         Interface
 2.2.2.2                 1    FULL/BDR     00:08:38    192.168.10.2    Eth1/1
 3.3.3.3                 1    FULL/BDR     00:00:49    192.168.10.6    Eth1/2


[NX-OS#2]

N9K2(config-if)# show ip ospf neighbors
 OSPF Process ID 1 VRF default
 Total number of neighbors: 2
 Neighbor ID     Pri   State          Up Time    Address         Interface
 1.1.1.1                1   FULL/DR       00:09:27   192.168.10.1    Eth1/1
 3.3.3.3                1   FULL/BDR    00:02:11   192.168.10.10   Eth1/3


[IOS#3]

Switch#show ip ospf neighbor
Neighbor ID     Pri    State           Dead Time   Address         Interface
2.2.2.2                1   FULL/DR         00:00:38     192.168.10.9   GigabitEthernet1/3
1.1.1.1                1   FULL/DR         00:00:35     192.168.10.5   GigabitEthernet1/2


잘못된 부분이 있으면 댓글 남겨주시면 감사하겠습니다.

반응형

'Network > Routing' 카테고리의 다른 글

Cisco NAT  (0) 2022.05.08
Cisco PBR  (0) 2022.05.05
Cisco RIP, OSPF, EIGRP 설정  (0) 2022.04.16
Cisco Routing Protocol [RIP, OSPF, BGP)  (0) 2022.04.16
Cisco Static Routing  (2) 2022.04.15
반응형

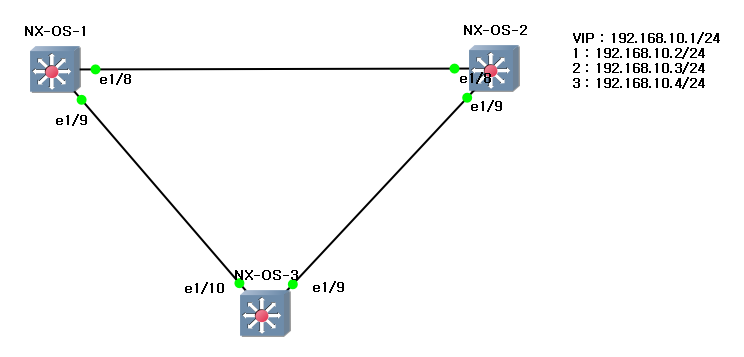
inter vlan 1에 IP 설정을 하겠습니다.


- HSRP 설정

NX9K-1(config)# feature interface-vlan
NX9K-1(config)# feature hsrp

NX9K-1(config)# interface vlan 1
NX9K-1(config)# ip add 192.168.10.2/24
NX9K-1(config-if)# hsrp 1
NX9K-1(config-if-hsrp)# ip 192.168.10.1
NX9K-1(config-if-hsrp)# priority 110
NX9K-1(config-if-hsrp)# preempt
NX9K-1(config-if-hsrp)# no sh


NX9K-2(config)# feature interface-vlan
NX9K-2(config)# feature hsrp
NX9K-2(config)# interface vlan 1
NX9K-2(config)# ip add 192.168.10.3/24
NX9K-2(config-if)# hsrp 1
NX9K-2(config-if-hsrp)# ip 192.168.10.1
NX9K-2(config-if-hsrp)# preempt
NX9K-2(config-if-hsrp)# no sh


NX9K-3(config)# feature interface-vlan

NX9K-3(config)# interface vlan 1
NX9K-3(config-if)# ip add 192.168.10.4/24


- HSRP 확인

NX9K-1(config-if)# sh hsrp brief
*:IPv6 group   #:group belongs to a bundle
                     P indicates configured to preempt.
                     |
Interface   Grp    Prio P State    Active addr      Standby addr     Group addr
  Vlan1        1         110  P Active   local                   192.168.10.3       192.168.10.1


NX9K-2(config-if)# sh hsrp brief
*:IPv6 group   #:group belongs to a bundle
                     P indicates configured to preempt.
                     |
Interface   Grp    Prio P State      Active addr      Standby addr     Group addr
  Vlan1        1      100  P Standby  192.168.10.2     local                     192.168.10.1 


1,2,3번 장비 초기화


- VRRP 설정

NX9K-1(config)# feature interface-vlan
NX9K-1(config)# feature vrrp

NX9K-1(config)# interface vlan 1
NX9K-1(config)# ip add 192.168.10.2/24
NX9K-1(config-if)# vrrp 1
NX9K-1(config-if-vrrp)# address 192.168.10.1
NX9K-1(config-if-vrrp)# priority 110
NX9K-1(config-if-vrrp)# preempt
NX9K-1(config-if-vrrp)# no sh


NX9K-2(config)# feature interface-vlan
NX9K-2(config)# feature vrrp

NX9K-2(config)# interface vlan 1
NX9K-2(config)# ip add 192.168.10.3/24
NX9K-2(config-if)# vrrp 1
NX9K-2(config-if-vrrp)# address 192.168.10.1
NX9K-2(config-if-vrrp)# preempt
NX9K-2(config-if-vrrp)# no sh


NX9K-3(config)# feature interface-vlan

NX9K-3(config)# interface vlan 1
NX9K-3(config-if)# ip add 192.168.10.4/24


- VRRP 확인

NX9K-1(config)# show vrrp
      Interface  VR IpVersion Pri   Time Pre State   VR IP addr
---------------------------------------------------------------
          Vlan1    1      IPV4          110    1 s    Y  Master 192.168.10.1


NX9K-2(config)# show vrrp
      Interface  VR IpVersion Pri   Time Pre State   VR IP addr
---------------------------------------------------------------
          Vlan1    1    IPV4           100    1 s    Y   Backup 192.168.10.1


잘못된 부분이 있으면 댓글 남겨주시면 감사하겠습니다.

반응형

'Network > Switching' 카테고리의 다른 글

Cisco ACL  (0) 2022.04.25
Cisco DHCP Secondary 사용  (0) 2022.04.24
Cisco Nexus 9000 telnet, ssh 설정  (0) 2022.04.20
Cisco Nexus 계정  (0) 2022.04.18
Cisco Nexus에서 wr 명령어 사용 방법  (0) 2022.04.18
반응형

- NAT

NAT(Network Address Translator 또는 Translation)는 원래의 IP 주소를 다른 것으로 변환하여 전송하는 것을 말합니다. 일반적으로는 사설(private) IP 주소를 인터넷으로 라우팅시킬 때 공인(public) IP 주소로 변환시키고, 인터넷에서 수신한 공인 IP 주소를 내부망으로 전송 할 때 다시 사설 IP 주소로 변환시킵니다.

사설 IP 주소는 IANA에서 할당받지 않고 관리자가 임의로 부여한 주소를 말합니다. 보통 10.0.0.0/8, 172.16.0.0/12, 192.168.0.0/16 대역의 주소를 사설 IP 주소로 사용합니다. 그러나 많은 조직이 IANA에서 사설 IP 주소로 지정한 위의 주소 대신에 임의의 네트워크 대역을 사설 IP 주소로 사용하기도 합니다.


- NAT의 용도

* 공인 IP 주소 절약

NAT를 사용하면 많은 공인 IP 주소를 절약할 수 있습니다. 예를 들어, 인터넷과 접속해야 하는 PC가 10,000대인 조직이 있다면 공인 IP 주소 10,000개가 필요합니다. 그러나 NAT를 사용하면 공인 IP 주소 1개만 있어도 10,000개의 PC를 인터넷과 접속하여 사용할 수 있습니다. 실제, 정부기관, 대기업 등과 같이 수만대의 PC를 사용하는 조직이 많으며, 대부분 NAT를 사용합니다.


* 네트워크 보안

NAT를 사용하면 내부에서 사용하는 IP 주소를 외부에서 알 수 없습니다. 따라서 보안성이 강화됩니다.


* 효과적인 주소 할당

IANA에서 IP 주소를 할당받는 경우, 원하는 대역을 지정할 수 없습니다. 그러나 사설 IP 주소를 사용하면 관리자가 원하는 대로 네트워크를 할당할 수 있으며, 결과적으로 효과적인 축약이 가능해져 라우팅 네트워크의 성능이 향상되고, 장애처리가 쉬워집니다.

그러나 통신 상대의 실제 IP 주소를 알아야 하는 특정 애플리케이션이 있다면 NAT를 사용하지 못할 수도 있습니다.


- NAT 설정

-SNAT-
ip nat inside source static [사설IP] [공인IP] 


-DNAT-

access-list [ACL넘버] permit [사설IP대역] [와일드카드마스크]

ip nat pool [이름] [공인 시작 IP] [공인 끝 IP] netmask [서브넷마스크]
ip nat inside source list [ACL넘버] pool [이름]


-PAT-

access-list [ACL넘버] permit [사설IP대역] [와일드카드마스크]

ip nat pool [이름] [공인 시작 IP] [공인 끝 IP] netmask [서브넷마스크]
ip nat inside source list [ACL넘버] pool [이름] overload


-NAT/PAT 정책 적용

inter f0/0 -- 사설IP interface
ip nat inside

inter s0/0 -- 공인 IP interface
ip nat outside


- NAT 동작 확인

Router#show ip nat translations


잘못된 부분이 있으면 댓글 남겨주시면 감사하겠습니다.

반응형

'Network > Routing' 카테고리의 다른 글

Cisco Nexus OSPF 설정  (0) 2022.06.05
Cisco PBR  (0) 2022.05.05
Cisco RIP, OSPF, EIGRP 설정  (0) 2022.04.16
Cisco Routing Protocol [RIP, OSPF, BGP)  (0) 2022.04.16
Cisco Static Routing  (2) 2022.04.15
반응형

- Policy Based Routing(PBR); 정책 기반 라우팅

PBR은 정책(Policy)를 기반(based)한 라우팅(Routing)으로써, Route-map을 이용하여 특정 조건에 해당되는 패킷을 라우팅 테이블과 관계 없이 관리자가 정책을 지정하여 원하는 곳으로 전송시키는 기능입니다.


route-map 에 정책에 속하지 않은 패킷(데이터)라우팅 테이블에 의해 전송됩니다.


* 패킷의 진행 방향을 변경하기 위해 특정 인터페이스로 수신되는 패킷의 출발지 주소를 먼저 비교하기 때문에 inbound 정책만 적용됩니다.

* 라우터의 특정 인터페이스로 들어오는 패킷들이 라우팅 테이블을 검색하기 이전에 PBR 정책이 적용됩니다.

* PBR을 적용시킨 특정 인터페이스에서는 수신되는 패킷들의 출발지 주소를 검사하므로, 라우터 스위칭 성능이 저하 될 수 있습니다.


EIGRP 설정, 192.168.10.1 에서 192.168.30.1 로 Ping을 날릴 때 192.168.20.2로 가도록 설정하겠습니다.


* R2 설정

R2(config)#ip access-list extended 100

R2(config-ext-nacl)#permit ip host 192.168.10.1 host 192.168.30.1

-> ACL을 이용하여 PBR을 적용시킬 패킷 지정


R2(config)#route-map PBR    -> PBR에서 사용할 route map 생성

R2(config-route-map)#match ip address 100    -> 적용받을 패킷을 불러옴(ACL)

R2(config-route-map)#set ip next-hop 192.168.20.2    -> Next hop 지정


R2(config)#interface f1/0

R2(config-if)#ip policy route-map PBR


R1#traceroute 192.168.30.1

Type escape sequence to abort.
Tracing the route to 192.168.30.1

  1 192.168.10.254 64 msec 92 msec 64 msec
  2 192.168.20.2 60 msec 60 msec 60 msec
  3 192.168.30.1 92 msec 100 msec 92 msec


(config)# route-map PBR

(config-route-map)# set ?

default interface : 출발지에서 목적지로 가는 경로가 라우팅 테이블에 없을 경우, 전송될 인터페이스를 지정한다. (4순위)

ip default next-hop : 출발지에서 목적지로 가는 경로가 테이블에 없을 경우, 전송될 next-hop 주소를 지정한다. (3순위)

interface : 목적지가 match 명령어에 의해 지정된 패킷이 전송될 인터페이스를 지정한다. (2순위)

ip next-hop : 목적지가 match 명령어에 의해 지정된 패킷이 전송될 next –hop 주소를 지정한다. (1순위)


잘못된 부분이 있으면 댓글 남겨주시면 감사하겠습니다.

반응형

'Network > Routing' 카테고리의 다른 글

Cisco Nexus OSPF 설정  (0) 2022.06.05
Cisco NAT  (0) 2022.05.08
Cisco RIP, OSPF, EIGRP 설정  (0) 2022.04.16
Cisco Routing Protocol [RIP, OSPF, BGP)  (0) 2022.04.16
Cisco Static Routing  (2) 2022.04.15

+ Recent posts